In this guide, I’ll show you the top ten yoga poses which are both easy, rewarding and fun to do.
You will have the key to grasping the world’s best-loved yoga poses, and you can keep coming back to this guide for free!
Want to know the best part?
These 10 basic yoga poses can be done in less than 30 minutes.
Who is this guide for?
This yoga pose routine is ideal for beginners but…
If you’re an advanced student, you can always benefit from getting back to the basics right?
First off, your going to see the top 10 yoga poses. Then, I’ll answer multiple frequently asked yoga pose-related questions.
Ready to unroll your yoga mat?
Let’s get started!
Click on a yoga pose below to jump down the instructions!
Click to tweet these 10 simple and fun yoga poses!
How to Do the Top 10 Yoga Poses
First, here are some important tips to make this routine work for you:
- Tip 1: Do each of the 10 poses in this order
- Tip 2: Be prepared for your yoga practice with an ideal place, a good yoga mat, and comfortable clothes which are not too tight or too loose
- Tip 3: Hold each pose for at least five breaths (inhaling and exhaling deeply equals “one breath”)
- Tip 4: Don’t overstretch: If you feel pain or discomfort, ease out of the pose slowly and modify for your comfort level
Here are the top 10 yoga poses:
- Mountain Pose (Tadasana)
- Bound Angle Pose (Baddha Konasana)
- Seated Forward Bend (Paschimottanasana)
- Standing Forward Bend (Uttanasana)
- Warrior II Pose (Virabhadrasana II)
- Tree (Vrikshasana)
- Fish (Matsyasana)
- Child’s Pose (Balasana)
- Easy Cross-Legged Pose (Sukhasana)
- Corpse Pose (Savasana)
Yoga Pose 1: Mountain Pose (Tadasana)

Tadasana is a pose where you stand firm and upright, like a mountain.
In Sanskrit (the Indo-European language from ancient India where the yoga tradition originated):
- Tada means a mountain
- Asana means “seat” or “physical posture”
Tadasana is the most basic standing pose of all standing poses in the yoga system.
How to Do Mountain Pose
- Stand up straight with your feet together, the heels and big toes touching each other
- Stretch your toes out as much as possible
- Tighten your thigh muscles and pull your knee-caps up
- Stretch your spine up
- Keep your neck straight
- Pull your stomach area in
- Try to evenly distribute the weight of your body evenly between both feet
- Try to press evenly between the toes and heels
- Rest your arms by your sides
Benefits of Mountain Pose
- Tones your leg muscles
- Alleviates lower back pain
- Improves overall posture
- Corrects posture imbalances
Bonuses (Insights and Tips from a Yoga Teacher)
Mountain Pose is great for correcting bad posture habits.
We have a tendency to place more weight on one foot than the other when standing, which can contribute to physical discomfort and lower back pain.
The unique distribution of weight in the soles of your feet actually says a lot about you, specifically your state of mind.
While there’s no hard science to back this up, I think you’ll find this interesting:
One of my yoga teachers explained that if you feel more weight on the balls of the feet and the toes, then you are probably thinking too much about the future. Likewise, if you have more weight on the heels, then you are thinking too much about the past.
If you practice this pose often, you may be able to “feel” whether or not this theory about weight distribution in your feet is actually true.
Let’s move right along to the second position…
Yoga Pose 2: Bound Angle Pose (Baddha Konasana)

Baddha means “restrained” whilst Kona means “an angle”.
How to Do Bound Angle Pose
- Sit on your mat with your legs outstretched.
- Bend your knees and bring the soles and heels of your feet together
- Hold onto your feet and bring your heels close to the pelvis
- Lower your knees towards the floor as much as you can
- Interlock your fingers, hold onto your toes firmly, and stretch your spine upwards
- Gaze straight ahead
- Hold the pose for 3-5 deep inhales and exhales
Benefits of Bound Angle Pose
- Develops flexibility in the inner thighs and hips
- Strengthens the back muscles
- Improves seated posture, preparing you to be more comfortable for seated meditation
- Increases blood circulation to the pelvis and abdomen, toning the kidneys and bladder
- Relieves sciatic pain
Bonuses (Insights and Tips from a Yoga Teacher)
This pose prepares you for seated meditation which is considered an important yet more advanced stage in your yoga practice.
A tip: Widen your shoulders to create more “openness” and lift in your chest. Try to keep your spine as tall and long as you can without collapsing in your chest.
As a yoga teacher, I tell my students to think of meditation as a “subtler” stage of the yoga practice because the attention is turned completely inward.
You don’t have to be some kind of expert in yoga before you can meditate!
Since this pose is preliminary to seated meditation, some yoga teachers say you should practice this pose for as long as it takes for you to feel comfortable in a seated, upright position.
Don’t be disheartened if you feel stiff and unable to hold the pose at first.
This is normal for beginners who have not yet developed the necessary strength in their back.
Keep practising and with time… you will be able to hold the pose with greater comfort.
Yoga Pose 3: Seated Forward Bend (Paschimottanasana)

In the seated forward bend posture, you stretch the entire back of your body.
Paschima literally means “the west”. It implies the backside of the whole body.
The eastern aspect (the direction from which the sun rises) is the front of the body.
How to Do Seated Forward Bend
- Sit on your mat with your legs outstretched
- Place your palms on the floor beside your hips
- Take a few deep breaths while keeping your spine straight and long
- Inhale, reach the arms straight up overhead, and lengthen your spine
- Exhale and reach your arms toward your toes, bending at the pelvic region
- Take hold of your legs at the ankles, or if you can, your big toes
- Bend your elbows and press your forehead down towards your knees
- Hold the pose for 3-5 deep breaths
If you are pregnant, you should modify Seated Forward Bend by doing this:
Simply spread your legs wide before bending forward to give your belly room to relax.
Benefits of Seated Forward Bend
- Tones abdominal organs
- Improves flexibility in the hamstrings and lower back
- Revitalises the sexual organs due to a deep stretch at the pelvic region
- Improves digestion
- Rests the heart
Bonuses (Insights and Tips from a Yoga Teacher)
“Live your life from the heart.”
I often say this to my students when I teach Seated Forward Bend in yoga class.
When bending forward, lengthen the heart towards the toes. Lead your action with your heart.
The pose feels better that way, because it creates more length in your middle and lower back.
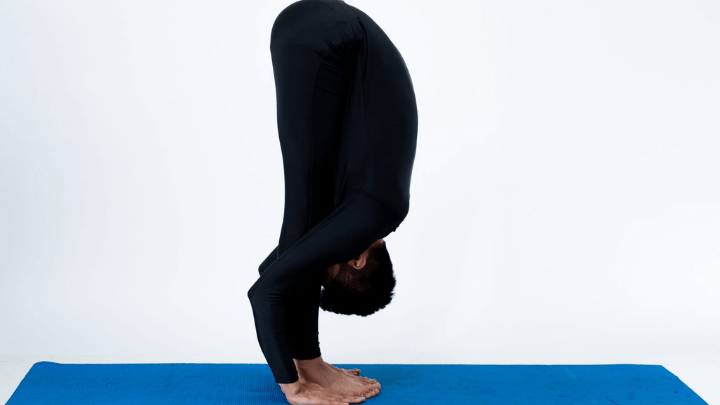
Yoga Pose 4: Standing Forward Bend (Uttanasana)

In this pose, you give your spine a deliberate and intense stretch.
In Uttanasana: Ut means “deliberation” or “intensity” and the verb tan means “to lengthen out”.
How to Do Standing Forward Bend
- Stand up straight with your feet together
- Exhale, bend forward and bend your knees until your palms touch your mat beside your feet
- Stretch your spine long and move your hips forward to bring your legs perpendicular to the floor
- Gradually move your trunk closer to your legs
- Press your nose toward your knees keeping your palms firmly pressing against your mat
Benefits of Standing Forward Bend
- Stretches your mid-to-lower-back muscles and relieves tension
- Tones abdominal organs and relieves stomach pains
- Slows down your heartbeat and rejuvenates spinal nerves
- Refreshes the mind, as your brain is lower than your heart and receives increased circulation
- Calming, soothing effect
Bonuses (Insights and Tips from a Yoga Teacher)
When I was a little girl, I used to love doing this pose. I would stand with my head between my legs and stare at the ceiling.
I would pretend that I was walking on the ceiling. It made my world look like it was upside down and I loved it!
In yoga class I tell my students, “Look up at the sky and imagine you can walk on those clouds. Now you’re walking on sunshine!”
To release the pose, inhale and lift up using your abdominal muscles and keep your knees bent to protect your lower back.
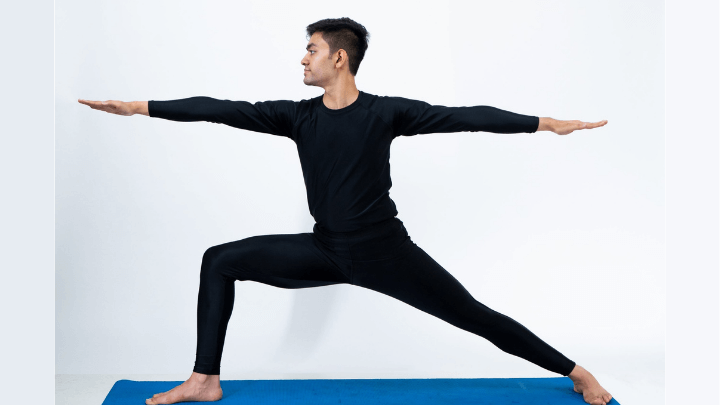
Yoga Pose 5: Warrior II Pose (Virabhadrasana II)

My body is my temple and asana my prayer. – B.K.S Iyengar
Virabhadra is a famous warrior in the ancient texts from India who developed superhuman strength by doing this and other yoga poses.
In Warrior Pose, you stand with your legs outstretched and one knee bent, thereby strengthening your thighs.
If you guessed from the name “Warrior II” that there also must be a “Warrior I,” then you’re right!
For this basic yoga pose routine, we’ve chosen Warrior II, because it’s a bit easier to do than Warrior I:
Warrior I involves subtler alignment instructions which are often challenging for beginners.
How to Do Warrior II Pose
- Start in a standing position
- Inhale and step your feet wider than shoulder-width apart
- Raise your arms sideways in line with your shoulders
- Turn your right foot sideways 90 degrees and bend your right knee until the right thigh is parallel to the floor, keeping the right shin perpendicular to the floor
- Turn your left foot slightly inward, keeping your left leg straight and tightened at the knee
- Extend your arms and stretch your hands out to each side
- Turn your face to the right
- Hold the pose for 3-5 full, deep breaths
- Repeat on the other side
Benefits of Warrior II Pose
- Tones and shapes the leg muscles
- Relieves calf and thigh muscle cramps
- Strengthens abdominal organs
- Facilitates increased concentration by holding the pose
Bonuses (Insights and Tips from a Yoga Teacher)
Warrior II Pose is an expression of a powerful warrior, poised and ready for action. In modern times, we are often called to be skilled in our actions in order to make an impact.
Consider holding this pose and asking yourself, “What kind of bold action can I take today to make a difference in someone’s life?”
Most yoga teachers say the arms should be outstretched with the palms down during this pose. But…
Over the years of my practice, I’ve found that turning my palms upward creates more space in my shoulder joint and deepens the stretch overall.
Furthermore, the yoga system includes mudras (hand positions) which have different meanings.
For example: palms up signifies a gesture of receptivity.
I like to think of Warrior II Pose with palms up as my being open to receiving inspiration and guidance about what kind of action I should take in my life.
Yoga Pose 6: Tree (Vrikshasana)

This is one of the most important standing poses in yoga.
Tree Pose resembles the way a tree looks, with your legs being the tree trunk and your arms as the branches.
In this pose, your head is like the top of the tree reaching towards the sky and your feet are like the tree roots, firmly grounding the tree to the earth.
In Sanskrit vriksh means “tree” and asana means “pose” (hence the name Vrikshasana)
How to Do Tree Pose
- Start in a standing position
- Shift your weight into your left foot
- Bend your right knee and reach down to catch hold of your right ankle
- Take your foot as high as possible, ideally pressing the sole of your right foot against the top in your inner left thigh
- Press your right knee back to line up with your right hip
- Press your palms together in front of your chest at your heart
- If you can maintain your balance in the pose, stretch your arms straight up overhead, keeping your palms together
Benefits of Tree Pose
- Tones and strengthens the leg muscles
- Strengthens the ankle and foot muscles
- Increases concentration
- Improves balance
Bonuses (Insights and Tips from a Yoga Teacher)
No matter how many times you fall out of the tree pose, just get right back into position again because:
A tree naturally sways in the breeze.
It is normal (especially for a beginner) to fall out of the pose because you are still developing your ability to maintain balance!
In yoga class, I instruct my students to softly fix their gaze on some object in the horizon which is not moving, like an actual tree (if we are outside) or a spot on the wall.
Concentrate on one point without moving your eyes away, as this will help to maintain your balance in the pose.
Yoga Pose 7: Fish (Matsyasana)

Matsya means a fish. The shape of your body in this asana (pose) resembles the curvature of an actual fish.
A story from ancient India tells about a divine being who took the form of a fish to save the original texts on yoga from a devastating flood.
How to Do Fish Pose
- Sit on your mat with your legs outstretched
- Lie on your back
- Insert your hands, palms down and thumbs together, just below the tailbone
- Raise your trunk up onto your elbows and forearms, lifting your chest and neck
- Rest your head back
- Keep pressing your chest up
Benefits of Fish Pose
- Expands lung capacity by stretching your chest and rib muscles
- Tones thyroid gland due to stretching in your neck
- Relieves tension in your neck muscles
Bonuses (Insights and Tips from a Yoga Teacher)
A yoga teacher of mine used to instruct us to “slide your hands into your back pockets” when getting into Fish Pose.
The palms beneath the tailbone serve as a support when placing body weight onto the forearms and lifting up the chest to create an expansion.
Here’s a tip:
Imagine a “golden thread” tugging your heart up to the sky.
In this pose, the heart area feels a kind of expansion, a spaciousness, a sense of opening up.
The expression, “open up the heart” applies to this pose, since it is considered a “heart-opening” pose.
Also, I recommend keeping your legs active and your toes pointed to facilitate more lifting up in the chest.
Yoga Pose 8: Child’s Pose (Balasana)

This pose is a classic one in yoga since it serves to rest and revitalise after doing many intense poses.
It is often used in yoga routines as a transition between other poses.
Also, the name implies the position in which small children (Bala) can often be seen resting in their cribs.
The pose is known to have a calming, soothing effect.
Moving on:
How to Do Child’s Pose
- Start in a kneeling position on your mat
- Inhale and extend your spine
- Exhale and stretch your trunk over your front thighs until your forehead touches the mat
- Separate your knees slightly if your abdominal area feels uncomfortable
- Rest your arms palms up beside your legs
If you are pregnant, you should modify Child’s Pose by doing this:
Don’t bring your buttocks all the way down to your heels. Instead:
Sit up high keeping your big toes together and spread your knees apart to create space for your growing belly.
Be sure to rest your forehead and breathe deeply into your back.
Benefits of Child’s Pose
- A soothing, calming effect which brings your heart rate down
- Enhances mental alertness due to the brain receiving increased oxygen
- Facilitates deep relaxation
- Relieves tension in the middle and lower back
Bonuses (Insights and Tips from a Yoga Teacher)
When I teach yoga to young children, I often use this pose as a great way to calm them down, especially if they are hyperactive or overly excited.
The pose has a perfect name for this reason!
Child’s Pose is a kind of inversion in which your head is slightly lower than your heart and in this position, your heart can rest because it doesn’t have to work as hard to circulate blood to your brain and extremities.
When I was a toddler I used to sleep in my crib in Child’s Pose (according to my mother).
I suppose I was getting ready to become a yoga teacher. Or maybe:
I intuitively knew Child’s Pose would calm me down and help me get to sleep.
I recommend trying this pose before bed. You can actually do the pose in your bed before going to sleep.
Yoga Pose 9: Easy Cross-Legged Pose (Sukhasana)

In this pose, you sit cross-legged on the floor with your spine straight.
Sukha means “pleasure” or “comfort” and asana means “pose.”
The name of this yoga pose may make it sound easy but many beginners will find their knees and hips to be stiff, making the pose more difficult.
Don’t be discouraged! This pose is one of the most basic and is suitable for all levels.
Sukhasana is recommended for the practice of meditation and pranayama (breathing exercises) in yoga.
Like Bound Angle Pose, this seated pose prepares you for seated meditation.
Other more advanced seated poses exist in the yoga system, but they require more flexibility in your knees and hips so…
For this Top 10 Yoga Pose series for beginners, we chose Sukhasana, because it is easiest for beginners.
How to Do Easy Cross-Legged Pose
- Sit on your mat with your legs outstretched in front
- Bend one leg and place your foot under the opposite knee
- Repeat on the other side
- Stretch your arms in front and rest the back of your hands on your knees with your palms up
- Keep your spine straight and long
Benefits of Easy Cross-Legged Pose
- Strengthens your back muscles
- Facilitates mental focus and relaxation
- Alleviates stiffness in your knees and ankles
- Increases circulation in your lower back and abdominal region, toning internal organs
Bonuses (Insights and Tips from a Yoga Teacher)
I encourage my yoga students to place a firm pillow under the tailbone to raise the hips higher than the knees, making the pose much more comfortable.
If you practice this pose when meditating, you may notice your back becoming tired.
This happens because you still need to develop more strength in the muscles supporting the upright position of your spinal column.
We tend to ignore our spinal posture each day and many people develop poor posture habits such as slouching.
With practice, the muscles develop and the joints become less stiff, and in time… you’ll feel an “ease” in the pose.
The upright seated position of your body will feel more natural when you practice the cross-legged pose consistently.
Yoga Pose 10: Corpse Pose (Savasana)

Sava means a corpse and asana means pose. In Corpse Pose you lie down on your back, imitating a corpse.
When dead… no movements are possible. You stay motionless while you are still fully conscious, thereby learning to relax.
The biggest challenge in this pose is to not fall asleep while your body is relaxed. Try to keep your mind alert whilst resting your entire body!
We are accustomed to constantly moving and fidgeting.
This is why Corpse Pose is considered the most difficult yoga pose of all because:
You’re learning to master your own mind while still in a fully conscious body.
How to Do Corpse Pose
- Lie on your back on your mat
- Stretch your arms beside you a little away from the thighs with palms up
- Close your eyes and relax your jaw and tongue
- Keep your heels together and let your toes relax out to the sides
- Breathe normally and concentrate on the sensations of your breathing
Benefits of Corpse Pose
- Rejuvenates your body and mind
- Soothes and calms the nerves
- Facilitates circulation throughout your entire body
Bonuses (Insights and Tips from a Yoga Teacher)
Corpse Pose is your golden opportunity to “absorb” the benefits of each pose.
In other words, it is essentially a “cool down” like you’d experience in cardiovascular workouts when you allow your heart rate to return to normal and your body temperature to cool down.
As a college professor at my local university, I recently taught a yoga class to a group of students and…
At the end of the class, one of them got up and tried to leave before the end of class, announcing he had somewhere to go.
“Slow down!” I said to him. I encouraged him to do Savasana Pose for at least one minute.
Savasana is considered to be the most difficult pose in yoga because we are used to being “busy” and always taking action.
While it appears to be easy, it is actually quite difficult to maintain a relaxed state without falling asleep or getting distracted!
This is why Savasana is considered the most important pose in yoga.
No matter how busy you are or how much you think you need to do, don’t skip Savasana!
Even if you’re short on time, just one minute of focused concentration in Savasana is sufficient to leave you feeling refreshed and renewed at the end of your yoga routine.
FAQ’s about Yoga Poses
Click to navigate:
- Why you can trust us
- Can yoga teachers do all poses?
- Can yoga help you lose weight?
- How do you get the benefits from yoga?
- How many yoga poses should you do in a day?
- What is a Chakra and how does it relate to your yoga pose?
- How should you sequence the basic yoga poses?
- How many yoga poses are there in total?
- Why are yoga poses in Sanskrit?
Why You Can Trust Us
My name is Parama Williams and I’m a Certified Yoga Teacher and university professor.
I’ve been studying and teaching yoga for over twenty years and my goal is to help you find the best yoga poses online.
Here is a great question my most curious students often ask me:
Can Yoga Teachers Do All Poses?
This depends on how long and how often your teacher has been practising yoga.
The advanced yoga poses, like Lord of the Dance Pose (Natarajasana), King Pigeon (Eka Pada Rajakapotasana) require a high degree of balance, concentration, and flexibility in the hip flexors and hamstrings.
Most people cannot even get into advanced postures like these without at least a year or more of consistent practice to develop the required strength, balance, and flexibility.
Most yoga teachers consider it important to practice regularly, aside from the time they spend actually teaching their classes.
If your yoga teacher appears to be out of shape, unhealthy or generally unable to actually do yoga poses, this doesn’t necessarily mean he or she can’t teach you some valuable things about yoga!
Remember: yoga is a complete system that goes beyond the physical to include philosophy and meditation.
Don’t make the mistake of thinking that yoga is all about being able to bend yourself into a pretzel shape! If you are not flexible, you can still do yoga.
As one yoga teacher said, “You’re never too old, never too bad, never too late and never too sick to start from scratch once again.”
Can Yoga Help You Lose Weight?
Yes! Any form of movement can help you lose weight along with a well-balanced diet.
A yoga session can burn between 180 and 460 calories depending on the length of your class is and whether or not you’re doing an intense style of yoga [1].
However, exercise and movement shouldn’t be your sole focus for losing weight. Instead… focus on asking yourself questions like:
Am I eating the right types of nutritious foods which allow for a well balanced diet?
How much food should I be eating?
Check out our recent post: How to lose body fat fast, for the secrets behind a successful weight loss.
Now, we all know yoga is a beneficial practice, but…
How Do You Get the Benefits From Yoga?
Be consistent.
It sounds simple but if you don’t practice yoga consistently then you’ll miss out on the benefits it has to offer.
Consistency is the foundation for any successful yoga practice.
One of the main reasons why my students miss a yoga class is because they “don’t have enough time.”
That’s why we created this article: to give you a yoga series that is safe for beginners and does not take an hour (like most other yoga classes).
Most people (especially working adults) don’t have enough time in the day to do yoga for an hour.
You may have kids to feed and get ready for school, grocery shopping, laundry, paying bills, getting to work on time…
Modern-day lifestyle can demand a lot of time.
But don’t let that be your excuse to not do yoga!
In case you’re wondering…
How Many Yoga Poses Should You Do in a Day?
Do as many yoga poses as you can safely and comfortably fit into your daily routine.
The Yoga Sutras of Patanjali, the earliest yoga text written more than 4,000 years ago, does not describe any poses. Instead, the text is all about how to practice yoga…
Approach your yoga practice with an intention to balance your body and your mind.
How many poses you do in a day is not as important as doing each pose with an awareness of your body and breath so you can receive all the benefits.
Can you do yoga every day?
You may be able to do yoga every day depending on your current fitness level, flexibility, and experience. But…
A study recommends taking rest days each week as they have shown to improve Heart Rate Variability (HRV), which aids your Automatic Nervous System (ANS), your ability to make a fight/flight decision. [x]
What Is a Chakra and How Does It Relate to Your Yoga Pose?

Chakras are described as the seven energy centres which govern various different functions within the physical and emotional body [2].
The chakras are described in Iyengar’s classic yoga book, Light on Yoga as “subtle centres in the body, the fly-wheels in the nervous system of the human machine.”
Although the chakras have not yet been verified by clinical studies, they’re described in ancient texts like the Hatha Yoga Pradipika dating back to the 15th century.
Yoga is considered a “mind-body” practise, meaning it balances the physical systems of the body as well as your mental/emotional state.
Now you understand the basic concept of chakras in the yoga system, let’s look at the top 10 yoga poses in terms of each chakra:
You can see from the chart that each yoga pose corresponds to a colour of the rainbow.
Consider the concept of your “light body” or “body of light”:
Visible light contains a colour spectrum that the human eye can view as the colours of the rainbow [3].
Your physical body has an energetic or vibrational aspect which is represented by the seven chakras.
Each chakra is traditionally believed to correspond to the frequency of each colour of the rainbow, which in turn corresponds to specific bodily functions.
A consistent yoga practice with proper sequencing can activate your “light body” by bringing all seven chakras into optimal functioning, thereby bringing your body and mind to its highest frequency.
In essence, the chakras play an essential role in how yoga works and why yoga helps you feel better.
How Should You Sequence the Basic Yoga Poses?
As you can see from the chart above, this basic yoga pose routine presents each pose in order, from the base of your spine to the top of your head.
By practising these poses in this specific order, you can achieve a sense of overall mind-body balance.
The Top 10 Yoga Poses Routine should take you 30 minutes or less.
You can make the routine longer by adding more poses or repeating poses or…
If you’re an advanced student, insert the “Sun Salutation“ series between each pose.
How Many Yoga Poses Are There in Total?
There is some debate about this question. One ancient text mentions 8,400,000 yoga postures [4]!
This astronomical figure can be better understood by taking into consideration the ancient Indian numbering system and the fact that it’s actually more metaphorical than literal, as the number “84” is a symbol of infinity in south Asia.
Other texts about yoga dating back to the 11th century describe 84 classic yoga asanas (postures) as being the most important, with the seated meditation postures being the end result of doing the other poses.
Before you can sit comfortably for an extended period of time in seated meditation, you must first practice other poses which strengthen and stretch your muscles in preparation.
To use a bicycle analogy, most yoga poses are like the training wheels (stabilisers) for a child.
When you feel confident your son/daughter is able to ride on their own, you take the stabilisers off.
Just in the same way when you feel confident you’re able to maintain form and balance in your yoga pose, you can increase the difficulty.
Why Are Yoga Poses in Sanskrit?
Yoga is considered to be a philosophy, a science, and an art which originated in ancient India. Sanskrit was the common language of ancient India dating back 3,500 years.
Yoga was orally transmitted from teachers to disciples and recorded in Sanskrit in ancient texts. Sanskrit scholars say the language is perfectly balanced in terms of the intonation (sounds)…
Why?
Because the ancient sages believed sound pervades all creation and represents the entire universe! So, they aimed to create a perfect language to encompass all of creation and to embody the quest for ultimate enlightenment.
So, when your yoga teacher uses Sanskrit in class, you can not only benefit from the physical effects of the pose, but you can receive a healing effect from the “vibration” of the perfectly balanced Sanskrit words themselves!
Conclusion
In this article, you’ve been given the formula for how to do a basic yoga routine with our top 10 yoga poses.
You’ve been shown the benefits of each pose for your physical, mental, and emotional health.
Now we turn it over to you:
Are you going to try the routine and see if you can do it in less than 30 minutes?
Or maybe you’re going to try Child’s Pose before bed to help you sleep tonight?
Either way, I’d love to hear from you in the comments below!